This guide will go over the basics of using CANbus on your 3D Printer. If you are building a Voron printer with CANbus, we highly recommend the #can_bus_depot Channel on the Voron Discord. Another great resource is the Voron CANbus guide put together by Esoterical.
¶ What is CANbus?
CANbus is a standard for communication between vehicle controllers developed by Bosch in the 1980's. It stands for Controller Area Network bus. Since it was designed to operate in the electrically noisy environment of automobiles, it is ideally suited to the (electrically) noisy environment of a 3D printer. CAN is a serial bus, which allows multiple nodes to be connected to the bus at the same time. CANbus required at least two nodes on the bus, with a terminating resistor at each end of the bus. Typically this will be a CAN Network adapter (such as the BTT U2C or the Mellow UTOC-3 boards) and your toolhead board (such as the BTT EBB36/42 or Mellow SB2040), though you are able to run multiple CAN devices on the same bus, the practical limit is around 30 devices.
¶ Why CANbus?
The main benefit of CANbus is the reduction in wiring to the toolhead, which can substantially reduce weight. Rather than having 14+ wires running to your toolhead, you only need 4 wires for CANbus. For the Voron 2.4 and Trident, it is also common use an umbilical cable rather than cable chains, further reducing the weight on the gantry.
¶ CANbus Wiring
CANbus toolhead boards typically require four wires, two wires provide the +24v and Ground, the other two are Can High and Can Low. The Can High and Can Low wires should be 22AWG or 24AWG, but the +24V and Ground should be at least 20AWG. These can be regular FEP/PTFE wire or an umbilical wire like Igus Chainflex. If you are starting a new build, or doing an upgrade, please check out our CANbus configurator to find the wiring needed for your build.
¶ CANbus ‘Network’ Architecture
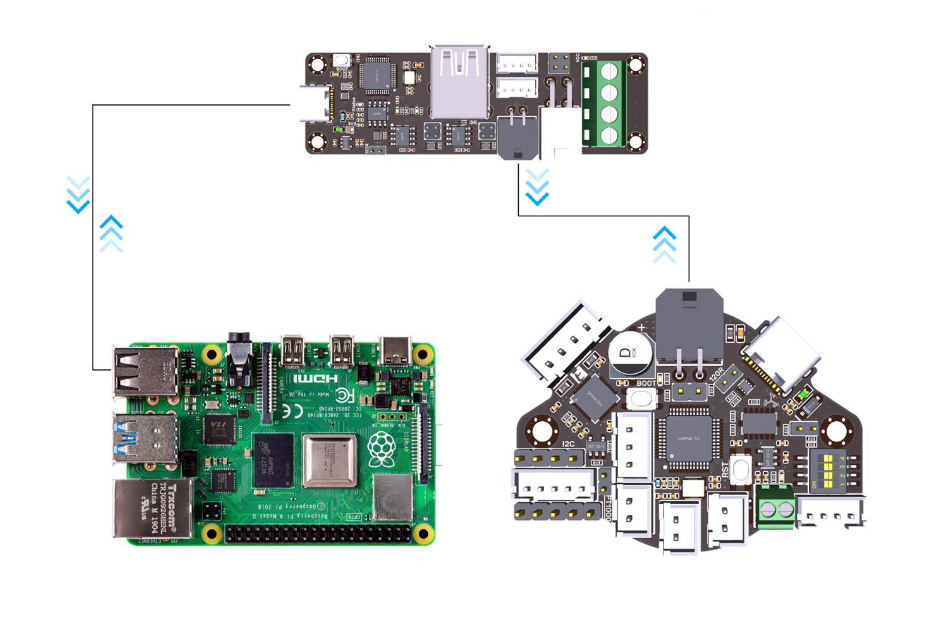
On a typical Klipper based printer, you use the following CANbus network.

This design allows Klipper running on your Raspberry Pi to communicate to the toolhead board via the USB to CAN Adapter.
You can also install firmware on your BTT Octopus that will allow you to use the built in CAN port on the board. This guide from Akhamar steps you through flashing the firmware and setting your Octopus MCU as a CAN adapter.