¶ LDO Clicky Clacky Door Mod
¶ Overview
-
In this writeup we will go over the LDO Clicky Clacky Door Mod for Voron 2.4 & Voron Trident. We will be mounting it to a 300mm V2.4.
-
We will we utilizing the Nano Nest Panels that are available for this guide but will overview the normal panel mounting as well.
¶ Hardware & Tools
- LDO Clicky Clacky Door Mod Frame Kit.
.jpg)
- Roll of 1 MM Foam
- NanoNest Panel Kit
.jpg)
- Allen head tools
- Small Hammer
- Side cutters / Scissors
- Printed Parts
- Super Glue
¶ Printed Parts
The following list is the parts that are needed to attach a Clicky Clacky door to a Voron.
Unfortunately there are no printing directions on the GitHub, We suggest the following settings.
¶ Print Settings
- 30%-40% Infill
- 4 Perimeters
- ASA / ABS ( use your favorite heating settings for either )
- Handle-Hinge_Bottom.stl
- Handle-Hinge_Top.stl
- Handle.stl
- Hinge-L-sleeve.stl ( X2 )
- Hinge-L-Solid.stl ( x2 )
- Latch.stl
- Panel_Clip.stl
¶ Hinge & Handle Assembly
You will need the following items:
- Hinge-L-Sleeve printed parts,
- Hinge-L-Solid printed parts,
- 5mm Dowel Pin X 2
- Little Hammer
With the solid hinge parts you can take a dowel and start slowly tapping in the dowel into the solid portion, you will want to leave about 20 mm sticking out of the top of the hinge, you can use a m3 x 20mm screws that you might have to measure it out quickly from the shoulder of the bolt.
.jpg)
After you have the dowel in the solid side you can grab 2 of the m5 x 7 x 8 split bushings, we will be inserting them into the Hinge-L-Sleeve parts that were printed.
With the sleeves you can do one of two options:
- You can put the sleeves onto the dowel of the solid part and then slowly tap the sleeve hinge part over the split bushings.
- You can slowly tap in the split bushings into the Sleeve Printed Part.
Make sure to tap the splitbushing deep enough so that it is not protruding out of the part.
.jpg)
Once the split bushings are installed into the sleeve printed parts you should be able to have the two parts go over the dowel and move freely.
.jpg)
We will be grabbing the parts for the handle and the latch as well.
We will need some super glue and the magnets that were proided in the hardware kit for the Door Kit.
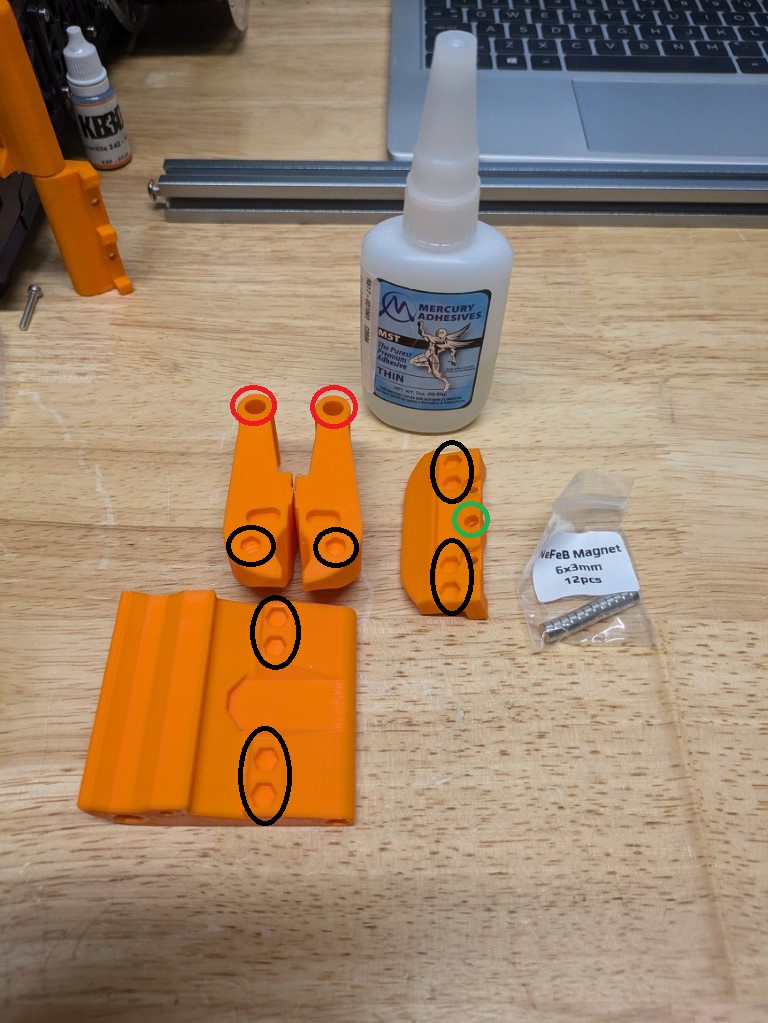
In the image above there are three sets of colors,
Black = Magnets
Red = Dowels
Green = Heat set insert.
We will start with the magnets portion of the handle.
All of the Black marked sections that are highlighted above will need a drop of glue and magnets that are attracted to each other,
Ensure that the magnets are fully pressed into the pockets so that they are notprotruding and causing wear against the other magnets.
If you look at Handle there are 4 magnet spots that match the Latch make sure that they are in order to attract to each other.
The Handle-Hinge_Top &Handle-Hinge_Bottom.stl also have a magnet location that matches with the handle.
.jpg)
The handle has two small holes on each end for the small screws, these are used to limit of travel for the handle.
Screw these two screws into the handle carefully do not over tighten.
.jpg)
.jpg)
This is the Latch, this ill need a heat set insert into the hole in the middle of the latch, Refer back to the photo with the different color circles, the green circle is the heat set insert.
.jpg)
Once you have the heat set insert in, and let it cool down for a few minutes, then you can attach the latch screw with the latch catch.
.jpg)
.jpg)
On the Hinge Top & Hinge Bottom, you can tap in the bushings that are supplied in the kit.
Remember to get them in all the way into the part, none should be sticking out.
.jpg)
On the Handle you can place the pins that are supplied in the kit, once those are in then you can assemble the hinge like the following photos.
.jpg)
.jpg)
.jpg)
.jpg)
¶ Frame Assembly
We will need the following items:
- Frame parts
- Hardware Kit
- Allen head drivers
.jpg)
There are 4 pieces of the frame, 2 are longer and 2 are shorter. The two shorter parts of the frame will have threaded ends. We will place the M5 x 16 screw into the end, you want to have it roughly about halfway into the end of the frame.
.jpg)
You will then place the longer parts of the frame on the ends of one of the shorter pieces with the screws, you can then start tightening down the allen head bolts through the predrilled holes in the long frame pieces.
Use 123 Blocks or a good 90 degree tool to make a good corner for the door.
.jpg)
Once the three pieces are screwed together you can place this off to the side.
Next we will get the nano nest panels set, If you are using the normal panels you can skip past this part.
.jpg)
With the nanonest panels together you will want to make sure that the cennter panel and the outter panels that are going to touch the inner panel have the temporary plastic taken off, then we suggest taping the corners together as shown.
.jpg)
Once the sides are aligned, use the 1mm x 8mm tape and place it around the edge of the panel stack, this is to reduce the amount of vibration that the panel has when placed in the frame.
.jpg)
.jpg)
Once you have all of the sides covered with the tape then you can grabe the frame piece that you put aside before.
Line the panel up and then slowly lower the panel into the frame and this will be a little tight but it will fit in the frame.
Once placed in the frame you can take the top part of the frame and you can fasten the top part of the frame to the rest of it.
.jpg)
This next part is the inserting of the rubber gasket for the normal panels, you will have to place and cut the gasket to each side, there should be enough to go around all 4 sides.
.jpg)
There is a Foam tape that is thicker, around 3mm thick, you will want to place this on the inner portion of the extrusion.
This will create a seal like a fridge door.
.jpg)
.jpg)
Dont forget to place the M3 roll in t nuts into the frame edge that will be attaching to the hinge side. Both on the printer side and the door side.
To align the door hinges, the best way that we have found is to utilize the upper panel clip and lower corner panel clip for the hinges.
Roll in four M3 T Nuts onto the side of the printer and line them up around the bottom panel clip and the Top Panel corner clip
Ususally we like to screw the part onto the t nuts and then move them into position.
The top hinge is going to go up against the top corner hinge just like the bottom hinge, Leave a little gap to make sure that its not to tight of clearance.
.jpg)
.jpg)
The opposing side, this side is the latch and the panel clip in one. you can use the M3 t nut that was used for the original clip.
Don't tighten it down all the way we will use it to align the door in the end.
.jpg)
You will need to place 4 M3 TNuts on the both sides of the door these will be used for the hinges and the door handle.
.jpg)
After connecting the hinges on the side of the door we can loosly attach the handle to the side of the door and utilize the handle side to align the latch side.
Center the latch on the side panel and lock down the latch.
Once the latch is locked down you can float the handle over the latch and move it up and down the door to get the perfect alignment.
Then you can lock down the four screws that are on the handle and you can test the door, if you have issues with the latch look to align the door better.
.jpg)
Congrats on the new Clicky Clacky Door.